How to screenshot on a Mac computer? How do you take a screenshot on a Mac to capture a full screen, a window, a selective portion of the screen, and even an entire PDF document? If you're a new user to Mac, or just move from Windows to Mac, you must be clueless on the Mac screenshot command.
In earlier macOS, screenshot controls are provided by the Grab app. But since macOS Mojave and later version, the Screenshot app has taken place. Therefore, the Mac screenshot shortcuts are a bit different in macOS and macOS Mojave. In this article, we'll list all Mac shortcuts in both system versions for you to take a screenshot for different purposes.
Contents
Part 1. How to Screenshot on a Mac 1. Capture a Portion of the Screen on Mac 2. Capture a Window on Mac 3. Capture a Full Screen on Mac 4. Screenshot an Entire PDF on Mac 5. Capture a Complete Webpage on Mac
Part 1. How to Screenshot on a Mac
1. Capture a Portion of the Screen on Mac
Sometimes we need to take a screenshot of a selected portion of the screen as a demonstration in our workflow. The Mac screenshot shortcuts are "Shift + Command + 5" or "Shift + Command + 4".
In All macOS Versions
Step 1. Go to the screen you want to capture, then press "Shift + Command + 4" on your keyboard.
Step 2. Drag your mouse to select an area of the screen and stop anywhere you'd like.
Step 3. The second you release your mouse, a new screenshot will be created at the same time. A thumbnail of the screenshot will briefly appear in the corner of your current screen, you can click on the thumbnail to open the screenshot. Or just go find it on the desktop of your Mac computer.
In macOS Mojave and Later Version
Step 1. Press the "Shift + Command + 5" shortcuts on the screen you want to capture. In macOS Mojave, you'll see the onscreen capture controls being opened.
Step 2. Click on the "Capture Selected Portion Box", drag and readjust with your mouse to select an area of the screen to capture. You can drag from within the selection to move the entire selection.
Step 3. Click the "Capture" button on the capture controls panel. Now the section of the screen you selected has been captured as a screenshot. Click on the preview thumbnail to view it or do a quick annotation with the markup toolbar.

2. Capture a Window on Mac
To take a screenshot of a window on Mac, we can use the same Mac screenshot shortcut as capturing a portion of a screen, with only a little difference in details.
In All macOS Versions
Step 1. Hit the "Shift + Command + 4" shortcut on Mac.
Step 2. Press the Space bar on your keyboard, and you'll see the pointer of the mouse changes to a camera icon.
Step 3. Move the "camera" pointer to the window you want to screenshot and left-click on it. The screenshot you capture in this way will include a shadow on the window you selected. If you want to exclude the shadow, just press and hold the "Option" key while you click.
Step 4. The screenshot is saved on the Mac desktop, go and check it now.

Tips
"You can press the "ESC" key to exit the screenshot mode anytime you want."
In macOS Mojave and Later Version
Step 1. Press "Shift + Command + 5" to activate the onscreen capture controls.
Step 2. Click the "Capture Selected Window" button on the capture controls bar. Your pointer of the mouse will be changed to a camera icon.
Step 3. Click on a window with your mouse, and it will be captured as a screenshot and saved on the desktop. Likewise, you can press and hold the "Option" key while you click on a window to exclude the shadow on the screenshot.
Step 4. You can click on the preview thumbnail at the corner of the screen to edit or delete it.

3. Capture a Full Screen on Mac
Capturing a full screen on a Mac is a lot easier than capturing a window or a portion of a screen.
In All macOS Versions
Step 1. Go to the screen you need to capture, then press "Shift + Command + 3".
Step 2. A screenshot of the current screen you're viewing is ready on your desktop.
In macOS Mojave and Later Version
Step 1. Press the "Shift + Command + 5" shortcut.
Step 2. Choose the "Capture Entire Screen" icon on the capture controls panel. The mouse pointer changes to a camera.
Step 3. Click on the "Capture" button on the controls bar to capture the display full screen, or directly click on anywhere on the screen.
Step 4. Check the screenshot on the desktop.

Tips
"All macOS screenshot shortcuts and commands we mention in this post work in macOS Mojave as well, yet the macOS Mojave shortcuts can't be used in macOS."
4. Screenshot an Entire PDF on Mac
This is probably an advanced screenshot technique to capture an entire PDF or other documents as a screenshot. Since most documents have more than one page, it's inconceivable to take a screenshot while scrolling down the document. But with Snagit, you can easily accomplish that.
Step 1. Download and install Snagit on your Mac computer.
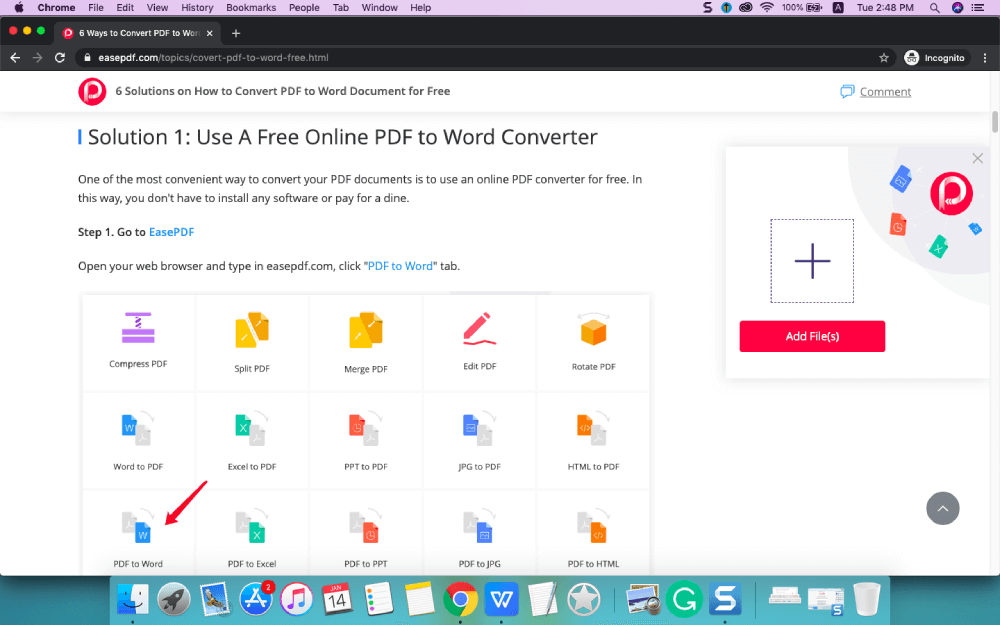
Step 2. Open the PDF or any document you want to capture with Preview or other viewers on your Mac.
Step 3. Run Snagit and choose the "Capture" button on the top-left of the interface to start a new capture.

Step 4. On the newly opened window, select "Image" on the left column. Then choose "Panoramic" from the drop-down list on the "Selection" section.
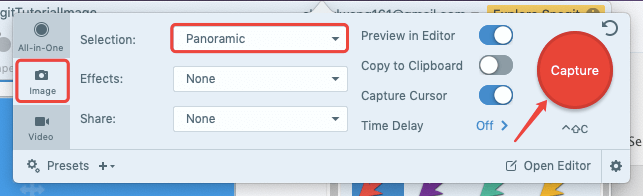
Step 5. Go to the PDF or another document, click on anywhere you want to start the capture, then hold and drag the mouse to select a region.
Step 6. Click the "Start" button to begin Panoramic capture.

Step 7. Scroll down on your PDF with the mouse slowly to let Snagit capture the whole pages of your PDF.
Step 8. When you finish scrolling, click the "Stop" button on the bottom menu bar. The screenshot of your whole document will be displayed on Snagit, you can make further editing on the program or directly save it to your Mac computer.

Tips
"Snagit helps you to capture all PDF pages as a single screenshot, which makes the image too long if there are many pages of your document. To save the PDF pages as images separately, you can convert PDF to JPG."
5. Capture a Complete Webpage on Mac
With Snagit, you can also capture a complete webpage as a screenshot with a few simple clicks.
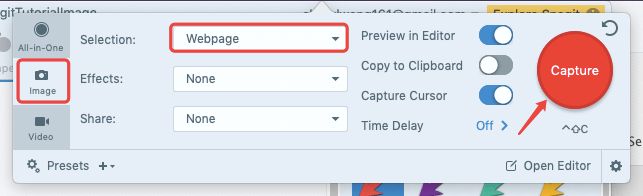
Step 1. Choose "Capture" on the top-left corner.
Step 2. Choose the "Image" capture mode and select "Webpage" on the "Selection" area. Then click the "Capture" button.
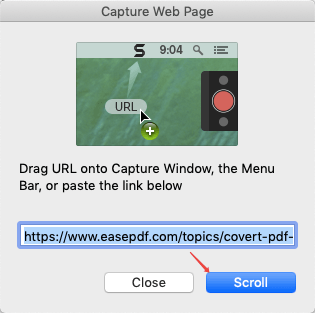
Step 3. Copy and paste the URL of the page you want to take a screenshot on the capture window, then click the "Scroll" button. Snagit will start to scroll and capture the entire webpage.
Tips
"Except for installing Snagit, you can also go to the easy way of using an extension on your web browser to take a screenshot of the entire webpage. For example, you can use FireShot on Google Chrome."
Part 2. How to Organize Screenshots on Mac
Now you've got all kinds of solutions of how to screenshot on a Mac and be able to capture as many screenshots as you like. But all screenshots will be saved on the desktop with the name "Screen Shot date at time.png" by default. This brings a lot of trouble in keeping all of your images in check. So we need to rename and organize the screenshots we just took for later usage.
Step 1. Create several folders for saving different kinds of screenshots.
Step 2. Rename the screenshots. We suggest you name every screenshot with a simple name that indicates its topic with keywords so that you can search and locate it on your Mac in seconds. You can also put a number in front of the image name to make the screenshots listed in a certain order.
Step 3. Classify your screenshots and put them to different folders.
These are the basic moves you need to keep all screenshots in orders and easy to manage. Some users will choose to convert the screenshot images to PDF so that they stay in the right order forever. Whenever you need to check a series of screenshots, you open the PDF and access the right information right away.

And if you found the screenshots are huge and need to reduce the image size, there's an awesome online app to compress image size quickly - FonePaw Free Photo Compressor.
Taking screenshots on Mac computer is quite simple, all you need to do is remembering the key Mac screenshot shortcuts and commands. And with the help of Snagit, you can capture an entire document like PDF, Word, PPT, etc and a webpage as a screenshot on Mac as well. Please feel free to let us know if you got better ideas on this topic.
Was this article helpful? Thank you for your feedback!
YES Or NO